Easy Steps| How to Take a Screenshot on a Computer Laptop
Published: 29 Oct 2024
Sometimes you’re working or browsing on a laptop, and you need to save what’s on the screen. But you might not know how to take a screenshot. In this article, we’ll explore an easy way to capture your screen on a Windows laptop. Even if you’re a student, a college user, or just using a laptop at home, this guide will help you. Let’s get started!
There are two easy methods to take screenshots in any brand laptop besides the Linux, Mac, Chromebook, etc.
1. How to Screenshots by using Shortcut Keys
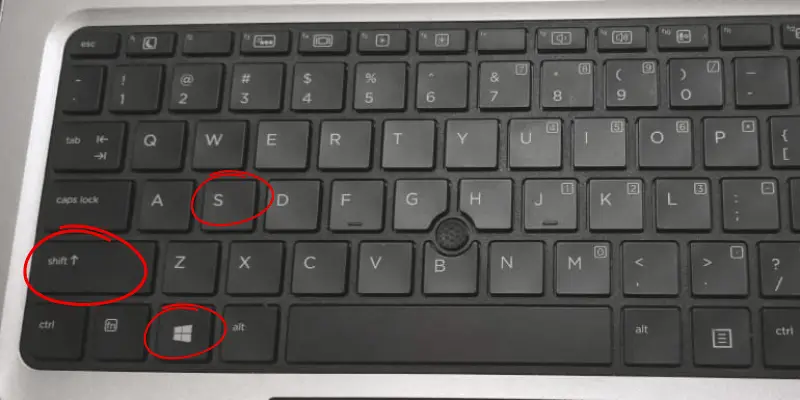
1. First of all, press “Shift + Windows + S” at the same time.
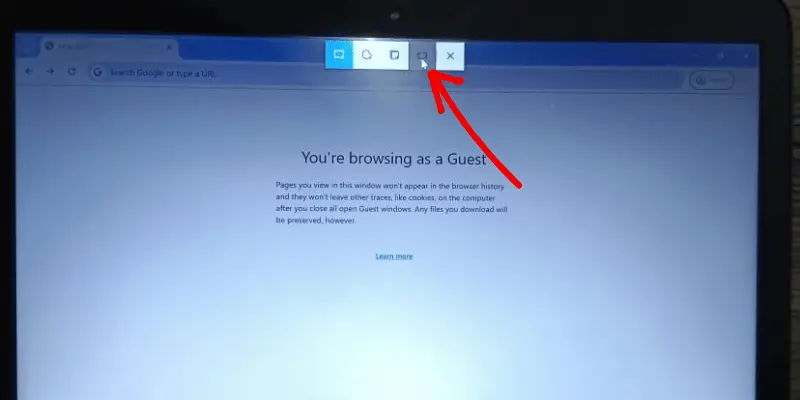
2. If you want to save a specific part of the screen, hold down the cursor and release it where you want to save the screenshot.
3. If you want to capture the full screen, click this option, and it will automatically take a screenshot of the entire screen.
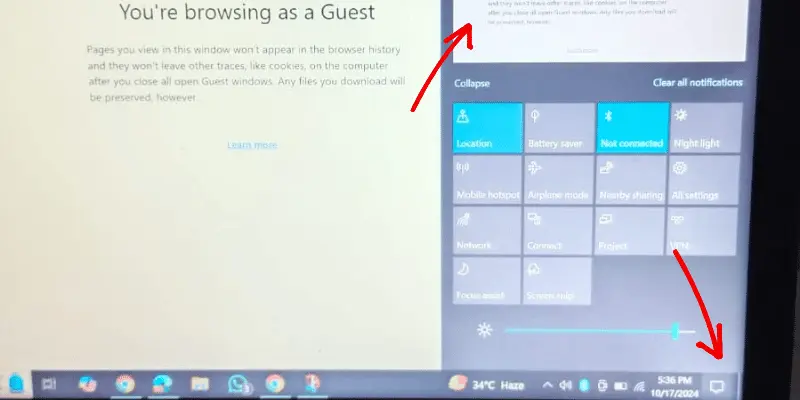
4. Then click on the taskbar option, and you will see the screenshot. Now click on it.
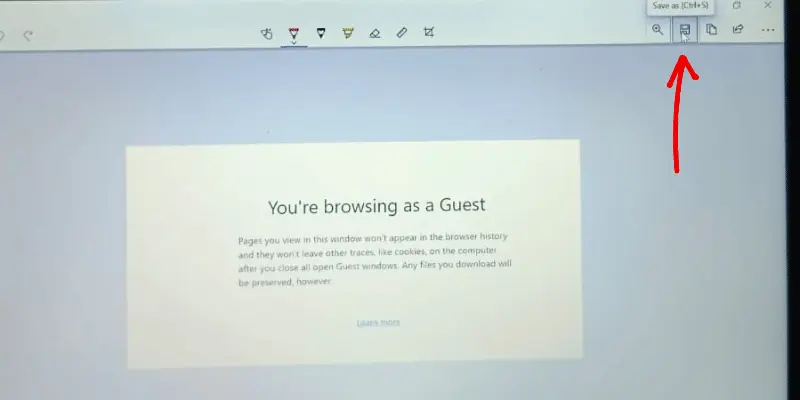
5. After clicking on it, you can save it by pressing “CTRL + S” together, or you can also save it by clicking the highlighted save option.
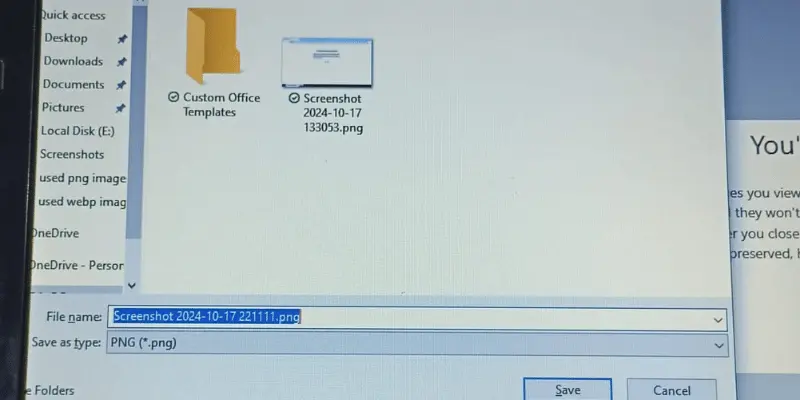
6. Now choose the folder where you want to keep the screenshot, then click on the save button or just press “Enter.”
Also Read this👇👇👇
How to Take a Screenshot on a Chromebook
How to Capture Screenshots on Your Mac
10 Incredible Benefits of Laptops
2. Screenshot by using Snipping Tool
- Click on the Windows icon on the taskbar, or you can also use the search option.

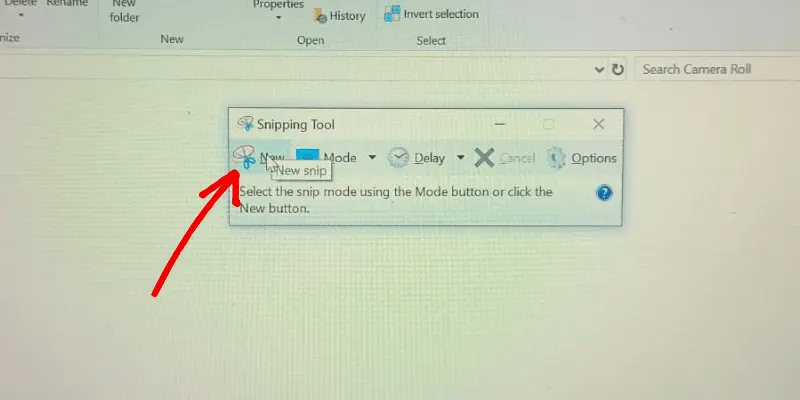
2. Type “Snip & Sketch” and click on “and then click on “Take a new snip.”
3. After that, follow the same steps as mentioned in the first method, starting from Point No. 2 to Point No. 6.
Who to takes a screenshot on laptop?
To capture a screenshot on a laptop, use your keyboard’s PrtScn (Print Screen) key. For more alternatives, try tools like Snip & Sketch or Snipping Tool, which allow you to choose which areas to record. The process may differ significantly based on your laptop’s operating system.
How to take a screenshot on laptop windows 11?
In Windows 11, press Windows + PrtScn to capture a snapshot of the full screen, which is automatically saved in the “Screenshots” folder under “Pictures.” To capture part of the screen, press Windows + Shift + S and then pick the area to capture. The Snipping Tool provides additional control and editing choices.
How to take a screenshot on laptop without printscreen button?
If your laptop does not have a PrtScn button, try Windows + Shift + S to open the Snipping Tool. You can also use third-party programs or tools to capture the screen, such as Snip & Sketch.
How to take and save screenshots in laptop?
To capture and save a screenshot, hit Windows + PrtScn on your laptop. The screenshot is immediately saved to the “Screenshots” folder within “Images.” If you use Windows + Shift + S or the Snipping Tool to capture an image, you must manually save it afterwards.
Can I take a screenshot without using the keyboard?
Yes, you can use the Snipping Tool and Snip & Sketch apps on Windows 10. These tools allow you to capture particular sections of the screen with a few clicks. You can easily find them by searching in the Start menu.
How do I use the Snipping Tool to take a screenshot?
Open the Snipping Tool from the Start menu, click “New,” and then choose the area you need to capture. After taking the screenshot, you can either edit or save it.
Can I edit screenshots in Windows 10?
Yes, you can edit screenshots in Paint, Snip & Sketch, or any other photo editing app. Snip & Sketch lets you to crop, sketch, and highlight instantly after taking a snapshot. For more advanced editing, use Paint 3D or third-party software.
Conclusion
It’s not hard to take screenshots on a Windows PC. With these simple solutions, you can record everything on your screen whether studying, working, or surfing at home With this knowledge, you can keep important data safe and share special times with others. This guide will make it easy for you to save the screen that you want.

- Be Respectful
- Stay Relevant
- Stay Positive
- True Feedback
- Encourage Discussion
- Avoid Spamming
- No Fake News
- Don't Copy-Paste
- No Personal Attacks


- Be Respectful
- Stay Relevant
- Stay Positive
- True Feedback
- Encourage Discussion
- Avoid Spamming
- No Fake News
- Don't Copy-Paste
- No Personal Attacks

